Features and Facilities
Features and Facilities are a group of services that allow a bank customer to perform various activities and manage the user accounts. These services include personal or general banking, finance management, bill payments, fund transfers, credit services, annuity plans, and so on.
The Features and Facilities component is categorized into the following sections or tabs:
- Features and,
- Facilities
A set of actions are grouped under each feature for a better classification of services being offered by a financial institution.
Use the Feature and Facilities component to view all the banking features with the Bank / Credit Union and / or Limit Groups.
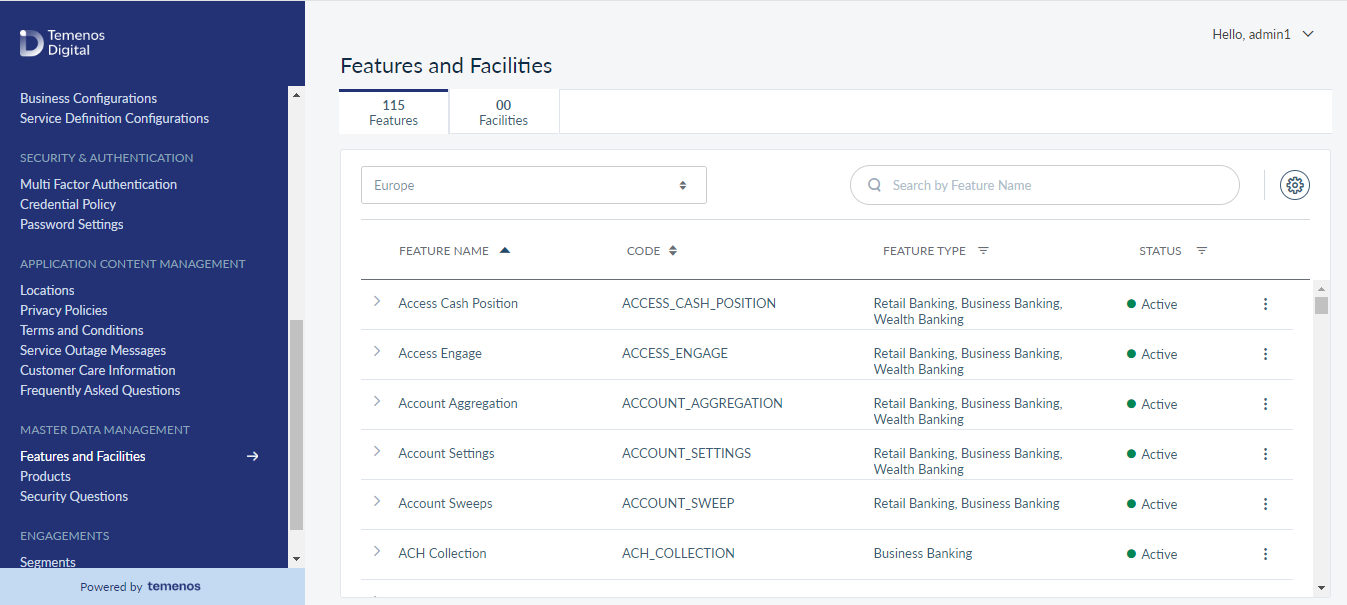
Menu path: Master Data Management > Features and Facilities
Features
The Features tab displays the following details:
- Feature Name: Name of the feature (account / card)
- Code: A unique identifier for a feature
- Feature Type: Category of the feature
- Status: Status of the product (Active / Inactive)
Click on any of the features to view further details. In addition, all the details listed here are fetched from the back-end system, and you can view only the listed information.
You can perform the following actions:
- Use sort icon to sort the column list.
- Use filter icon to filter the Feature Type and Status (active or inactive).
- Use download icon, present at the top right corner of the page to limit a group or to download the list of features in an excel file.
Settings Icon
Users can download the list of all features in a CSV file with the following details Feature Name, Feature Code, Feature Type, Action Name, Action Code, Action Type, Category, Action level, Access level, Status, and Company Legal Entity.
Search
You can search for the required feature using the Search button. To perform the Search, enter the feature name in the Search field and press Enter. The app displays the list of features matchin the search criterion.
Contextual Menu
The contextual menu shown against each feature allows you to Edit and Activate / Deactivate (depending on the feature status). It is also displayed on the Feature Details page.
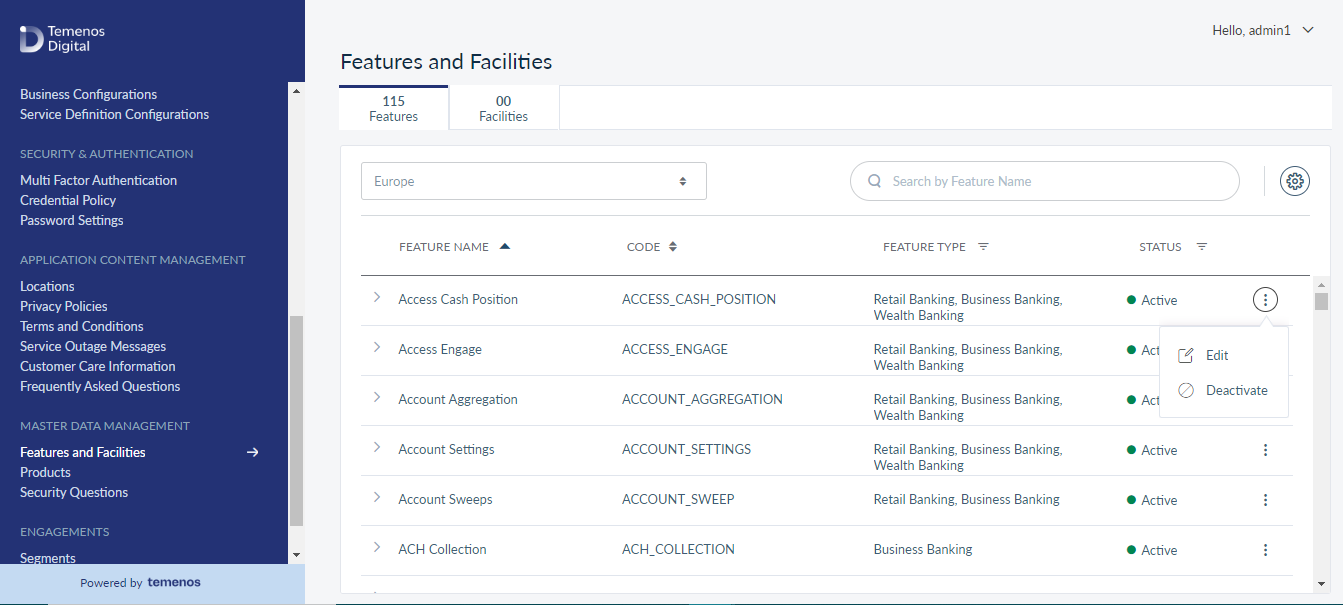
Tip: Click on any of the features list (Feature Name / Code / Feature Type / Status) to view a detailed information
View Feature Details
You can view detailed information and the actions associated with the specific feature. The feature details include:
- Feature Code
- Feature Type
- Service Fee
- Display Content - (Any description applicable to the respective feature). It also facilitates you to select a preferred language from the drop-down list.
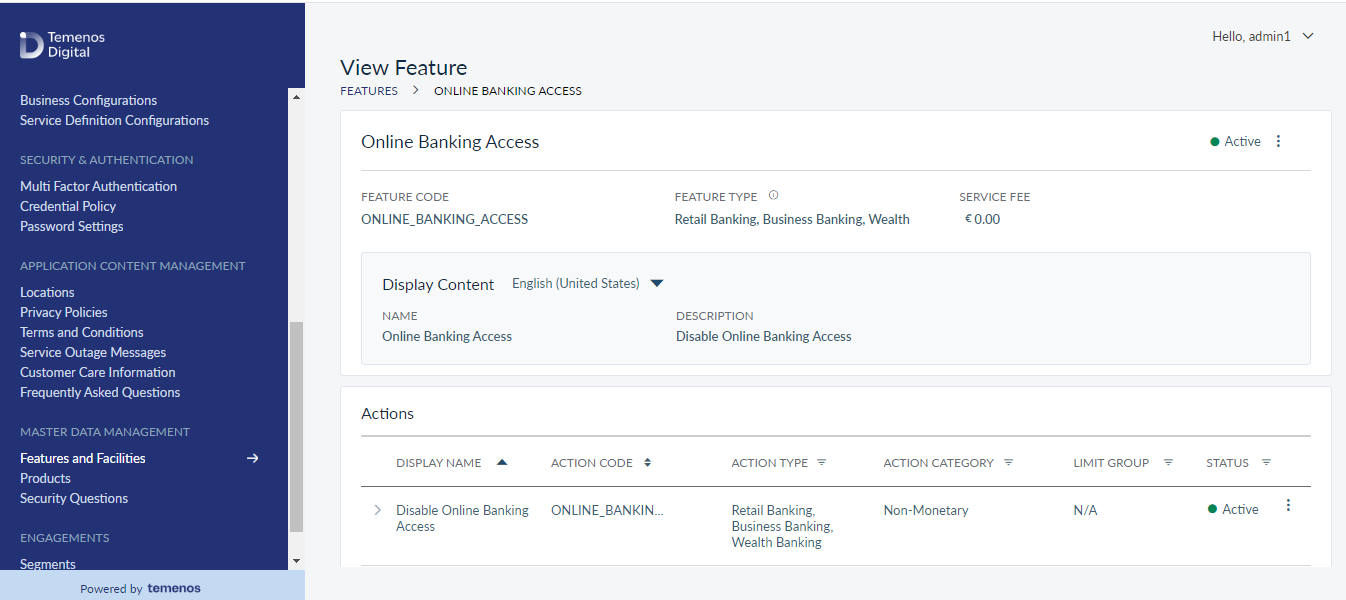
Action: This section describes about the:
- Display Name - Name of the action.
- Action Code - Displays the action code.
- Action Type - Displays the action type (whether it is related to Retail Banking or Business Banking).
- Action Category - Displays the action category in terms of monetary or non-monetary benefits.
- Limit Group - Displays the limit group based on the Action Category.
- Status - Displays the feature status (either as active or deactivated).
Tip: You can filter the list using Action Type (Retail Banking or Business Banking), Action Category (Monetary or Non-Monetary), Limit Group (if any), and Status columns.
If a deactivated feature is selected, then the system pops up with the following message:
Edit Feature
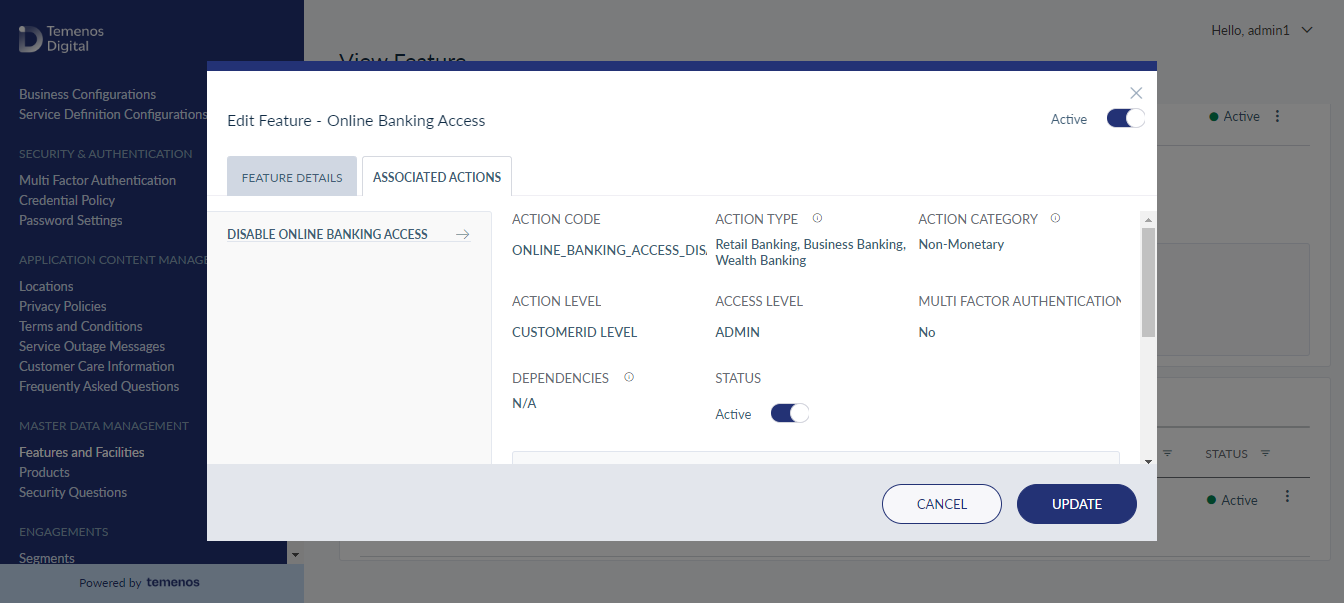
You can edit a feature either from the Features List page or from the Feature Details page. To edit a feature, follow the below steps:
- On the Feature list page or from the Feature Details page, click the contextual menu and then on Edit. A new pop-up window, which is categorized into two tabs - Feature Details and Associated Actions is displayed as shown below:
Edit Feature Details
Under the Feature Details tab, you can modify only the below details:
- Status : Toggle it either to activate or deactivate the feature.
- Service Fee : Enter the service fee. Only the numerical value is accepted.
- Description : Modify the feature description, if any. The description is mandatory, and the maximum number of allowed words is 100.
Feature Type, Code, and Name fields are non-editable.
Once the required details are entered, click Update.
Edit Associated Actions
Under the Associated Actions tab, you can edit the actions. The allowed actions, which are mapped for a specific feature will be displayed on the left side of the windowpane as shown below;
If the action type is monetary, then you can define the transaction limit for the following:
- Minimum value per transaction
- Per transaction limit
- Daily transaction limit
- Weekly transaction limit
For monetary or non-monetary action types, you can view only the Terms and Conditions by clicking on View. It also facilitates you to view the Terms and Conditions in a preferred language, by selecting a language from the drop-down list.
Limit Increase : When limits are increased at the Feature level, it will not impact Service definition, Contract, Customer Role, and Customer level. The user needs to change them manually.
|
|
Feature |
Service Definition |
Contract |
Customer Role |
Customer |
|---|---|---|---|---|---|
|
Feature |
Change at |
No Impact |
No Impact |
No Impact |
No Impact |
|
Service Definition |
NA |
Change at |
No Impact |
No Impact |
No Impact |
|
Contract |
NA |
NA |
Change at |
No Impact |
No Impact |
|
Customer Role |
NA |
NA |
NA |
Change at |
No Impact |
Limit Decrease : When limits are decreased at the Feature level, it will impact Service definition, Contract, Customer Role, and Customer level. The user need not change them manually.
|
|
Feature |
Service Definition |
Contract |
Customer Role |
Customer |
|---|---|---|---|---|---|
|
Feature |
Change at |
Limit auto-update |
Limit auto-update |
Limit auto-update |
Limit auto-update |
|
Service Definition |
NA |
Change at |
Limit auto-update |
No impact |
Limit auto-update |
|
Contract |
NA |
NA |
Change at |
No impact |
Limit auto-update |
|
Customer Role |
NA |
NA |
NA |
Change at |
Limit auto-update |
Deactivate / Activate Feature
To activate or deactivate a feature, click the Active / Deactivate option from the contextual menu. The feature status will be displayed based on the current selection. You can edit a feature even if it is deactivated.
- Any feature whose status is active, then by default, it should be active at Service definition, Customer Role, Contract, and customer level.
- Any feature whose status is deactivated, then by default, it should be active at Service definition, Customer Role, Contract, and Customer level.
- Features whose status is deactivated at Master Data level then the respective feature should not be shown at Service definition, Customer Role, Contract, and Customer level.
Limit Group
Based on the bank’s customer requirements, the monetary actions are classified into limit groups.
To view or edit a Limit Group, follow these steps:
- On the Features list page, click Limit Groups, present at the top-right corner of the screen. The Limit Group displays the following details:
- Limit Group - Displays the name of the Limit Group.
- Limit Group Code - Displays the code for the Limit Group.
- Click the edit icon to edit a Limit Group. The following screen appears:
- Click Update. The system updates the entered details for the Limit Group.
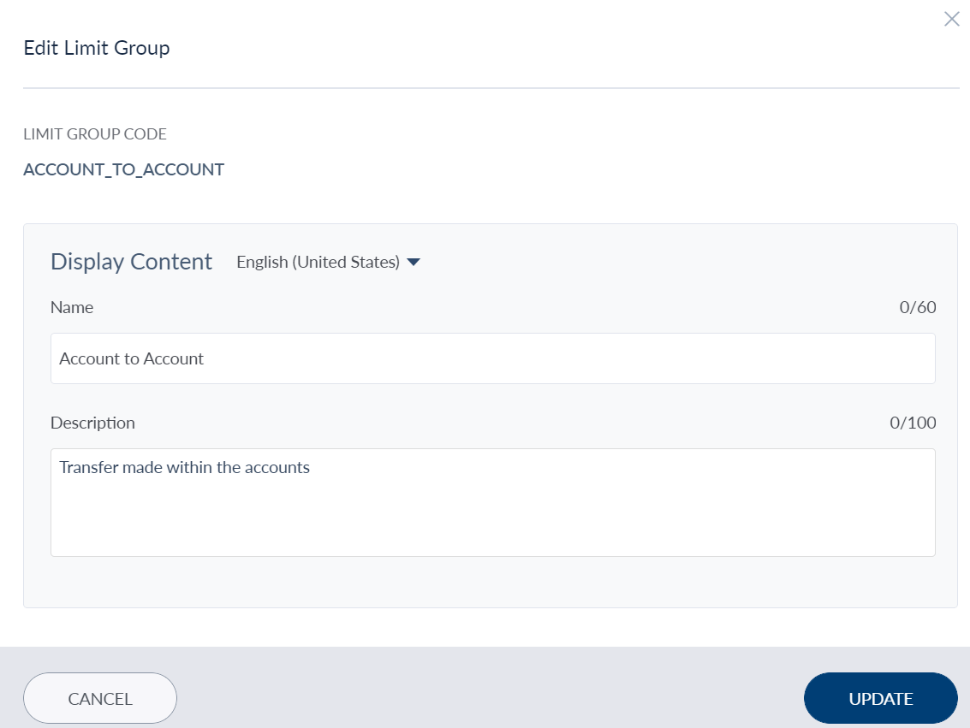
In the Edit Limit Group screen, the system auto-displays the Code by default and it is non-editable. Modify the Name and Description fields if required.
The bank employee can assign per transaction, daily and weekly transaction limits.
Facilities
Facilities are the additional capabilities that are available for a specific product. When the user opts for any of these services, the basic features and actions associated with the product can also be availed. Credit card, and check book are some of the examples of services.
Premium Cheque Book, and the Credit Card are the Facilities that can be offered to a user account.
The Facilities tab displays the following details:
- Facility Name: Name of the Facility
- Facility Code: Code for a Facility
- Number of Features: Displays the Features Count
Tip: Sort the list for the columns using the sort icon. In addition, click on Add Facilities button, present at the top right corner of the page to add a new facility for the existing account holder or for a new user.
Search
You can search for the required facility using the Search button. To perform the Search, enter the facility name in the Search field and press Enter. The app displays the list of facilities matching the search criterion.
View Facility Details
You can view detailed facility information and the actions associated with the specific facility. The facility details include:
- Facility Code, and
- Description, if any
Action: This section describes the following
- Action: Name of the action.
- Description: Description for action, if any.
- Status: Displays the facility status (either as active or deactivated).
In addition, you can search for a facility using the Search button.
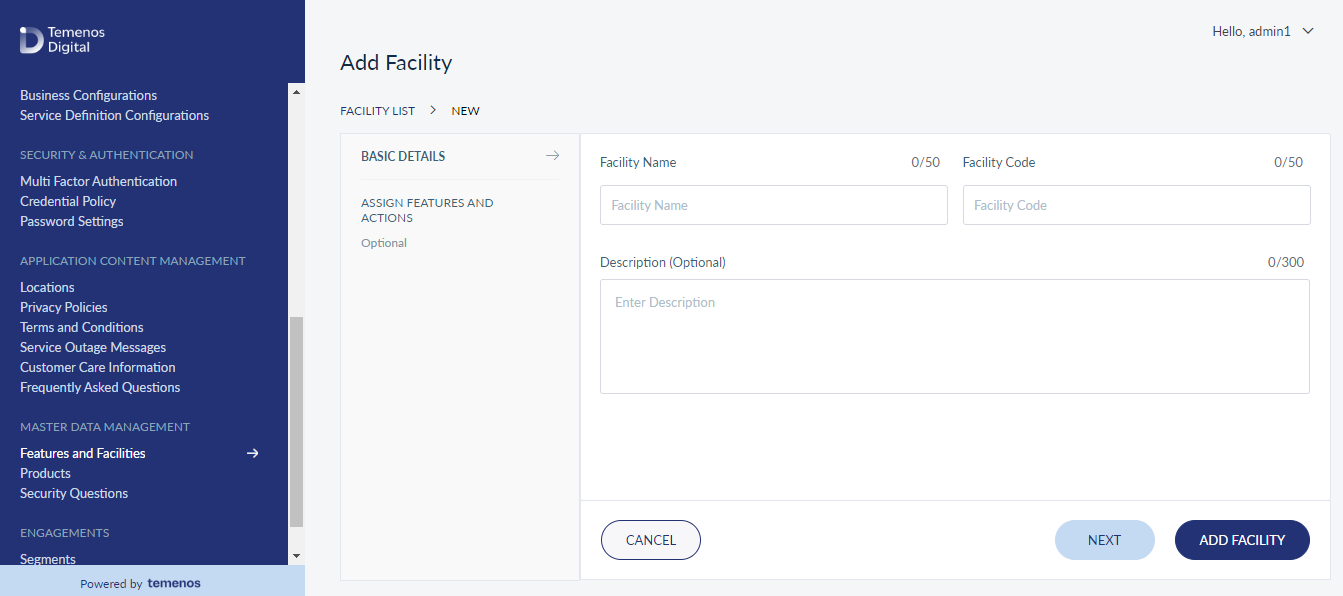
Add Facilities
You can add or create a new facility for the existing account holder or for a new user. To add a Facility, perform the below steps:
- Click on Add Facilities button, present at the top right corner of the page. The application displays the Add screen to add or create a new facility.
- Enter the Facility Name, Facility Code, and a Description, if any, and click Save.
- After adding the basic details, you need to assign features and actions applicable to that particular facility.
Edit Facility
You can edit a facility from the Facilities List page or from the Facility Detailed page. To edit a facility, follow the below steps:
- On the Facilities list page, click Edit icon, or select a Facility and then click on the Edit button.
- Modify the required details and click Save.
- Feature code is non-editable.
Features (Master Data Management) - Multi-Entity
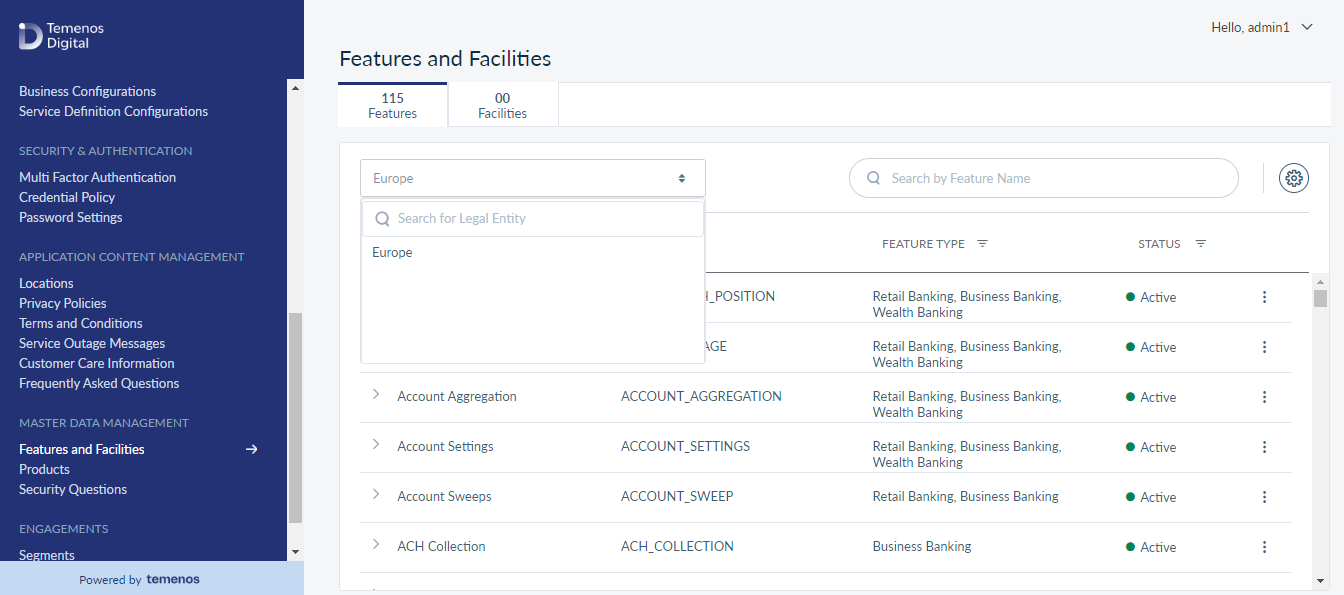
As a Spotlight administrator with sufficient permissions, you will be able to access the features [Master Data] that belongs to the legal entity that you have access to.
- When you access features [master data], legal entity drop-down will be displayed with all the legal entities that you have access to.
- When you select one of the legal entity, the system will only display the features that are available for the selected legal entity.
- Multi - legal entity selection is not applicable. You will be allowed to select only one legal entity at a time.
For instance, when you have access to two legal entities - Kenya and South Africa. Legal entity drop-down will only show these two values:
- When you select South Africa from legal entity drop-down, the system will list the features available for South Africa.
- When you select Kenya from legal entity drop-down, the system will list the features available for Kenya.
In this topic